For what purpose the plug-in Background Remover may be use?
How often do you catch yourself at an idea to change something in an image you are looking at? Are you always happy with the context of a photo you have made? Do you believe yourself to be a very creative person who takes a photo only as a start point for your flight of fancy? Please read our notes below concerning image editing plug-in BACKGROUND REMOVER and you can find an answer to many questions you may hesitate to ask.
Look at the image shown in Fig.1. Let for some reason you are going to extract the girl’s portrait from this image only. In other words the girl portrait is the object of interest to be kept here while sky and clouds are the context to be removed. How to get a desirable result looking like image in Fig.2?
 |
 |
Fig.1 Source image. |
Fig.2 Extracted object. |
Look at the image shown in Fig.3 where the situation may be quite different. Let the object be kept here is the man’s portrait while the girl’s portrait, sky, grass, trees represent the context to be removed. How to get a desirable result looking like image in Fig.5?
What is the common feature for both of these tasks? It is the fundamental concept of "OBJECT" and "BACKGROUND". The former deals with something in an image that should be kept and the latter concern the rest part of an image that should be removed. The idea of the "OBJECT" and "BACKGROUND" is relative and always depends on your desire at the given moment. You see that the girl’s portrait is the "OBJECT" in the first case and is the "BACKGROUND" in the second one.

Fig.3. Source image.
 |
 |
Fig.4. Object is the girl. |
Fig.5. Object is the boy. |
What are the possible ways to keep "OBJECT" and remove "BACKGROUND" successfully? Anyone skilled in the image processing with graphic editors like Photoshop may advice you to try LASSO tool there. Do not hurry to follow this advice! Remember that a mouse controlled "OBJECT" outline drawing with cursor is not a simple task as you can think first. Sometimes it may demand laborious work due to the "OBJECT’s" outline complexity.
Looking, for example, at the Fig.6 you can imagine how difficult it is to follow the outline of a plant in a flowerpot.
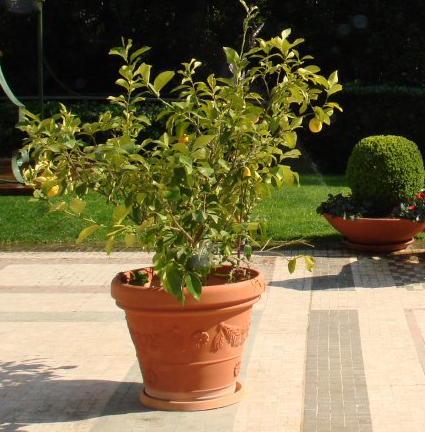
Fig.6. Object with complex structure.
Another person can advice you to try MAGIC WAND tool working with
color distribution in the "Object" and "Background". Sometimes it does help. However in some cases it does not work properly, for example, when object and background’s
color distributions are strongly overlapped. That is what we see in the examples shown in the figures 1 and 3. In such cases one should manipulate with such a parameter as TOLERANCE for rather long time repeating selection over and over again.
To save your time and minimize your efforts we would suggest an alternative solution that is our plug-in Background Remover. From its very name one can understand clearly that this plug-in is designed for background removing. All you need is to mark some "Object" and "Background’s"
colors with green and red stripes respectively. This procedure is done with the tools Mark object  and Mark
color for erasing
and Mark
color for erasing  (see examples shown in the Fig.7 and Fig.8). After marking is completed you only need to press APPLY button to
fulfill the operation of the object keeping and background removing.
(see examples shown in the Fig.7 and Fig.8). After marking is completed you only need to press APPLY button to
fulfill the operation of the object keeping and background removing.
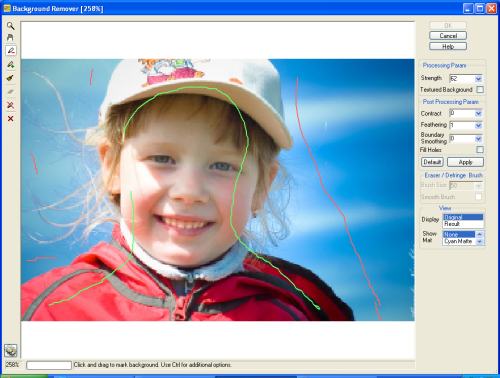
Fig.7. Mark object and background colors.
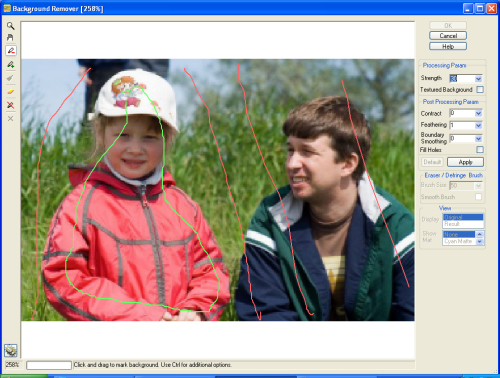
Fig.8 Mark object and background colors.
Some terminology remarks
One intuitively understands the word “Background” as image elements surrounding the main object of interest. For example, some particular screen is used for official photo of a person. Sometimes this screen is painted in some particular
color (often blue or white one). So here such a screen is a background. Conversely, in amateur photography any subject or set of subjects may form a background – sky, flora, wall, beach, water, other persons, furniture and so.
Anyone experienced with image processing knows that the "Background" may also mean the bottommost image in the Layers palette, i.e. the "Background" is the lowest layer in the stack. Such a meaning of the "Background" does have nothing in common with all that was said about it before. Nevertheless you need to know it as well since our plug-in does not work with Background layer. It works with a regular layer only that should be created before the launching of the plug-in. To promote the Background layer to the regular one you need to use a special command that is available in the most of graphic editors. For example, in Paint Shop Pro X it is: Layers>Promote Background Layer.
The simplest script for using our plug-in Background Remover may be the following:
- Open an image in the graphic editor you use.
- Transform the opened image to the regular layer.
- Call the plug-in Background Remover, for example carrying out the following command in Pain Shop Pro X: Effects>Plugins > Image Skill>Background Remover
- Using the tool “Mark Object” , mark with green strokes areas of image are to keep.
- Using the tool “Mark color for erasing” , mark with red strokes areas of image to be removed.
- Presses the button APPLY to carry out selection.
- Press OK button to exit the plug-in and return to the main program, if the result satisfies you.
How can you adjust the plug-in and correct the result?
It is not obligatory that the very first time you use the Background Remover you get a completely satisfactory result. What should you do next? There is no common advice how to make your result better. One general recommendation is not to be afraid of experiments with you image. Remember that remaining under the Background Remover control you always can use the button RESET  and come back to the original image and make a new attempt using the new marking or (and) the new parameters value. Even you exit the Background Remover and returned to the main graphic editor using the APPLY button, you can cancel your actions using the command UNDO or the similar one of your graphic editor. Note that only after the command SAVE in the main graphic editor you will not be able to come back to the original image.
How can you experiment with an image using Background Remover?
First of all you can change your marking. That can be done with the tools “Mark Object” and “Mark
color for erasing” , described above. Besides you may adjust the set of parameters.
The first one is STRENGTH parameter that defines the aggressiveness of background elements removal. Its default value is 30 but it may be set with a slider in the range between 0 and 100. The more value of this parameter is the more image fragments are deleted. The Fig.9 and Fig.10 show the result with STRENGTH equal to 30 and 100 respectively.
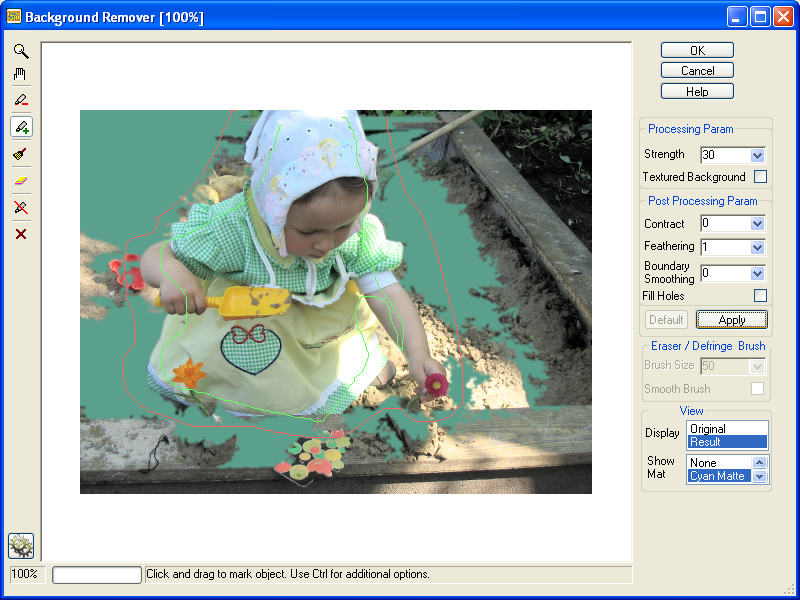
Fig.9 STRENGTH = 30.
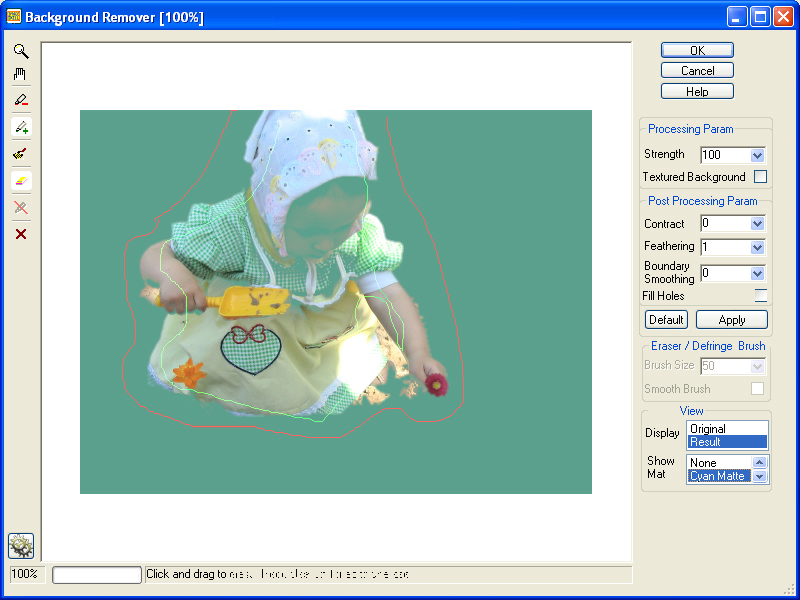
Fig.10. STRENGTH = 100.
It is obvious that the choice of both values is not good enough: in the first case there is a lot of rubbish on the resulting image, while in the second one some fragments of
girl’s clothes have disappeared. Setting intermediate STRENGTH value equal to
65 (see Fig.11) you can get a rather satisfactory girl's extraction but some fragments of background remain. Varying the STRENGTH value you can get some compromise result but nevertheless it may be far enough from the one that makes your happy. One of the reasons for getting an inappropriate result may be in a rather complicated background as you can see in the example above. So another option for the result enhancement we would suggest is to take into account the complexity of the background.
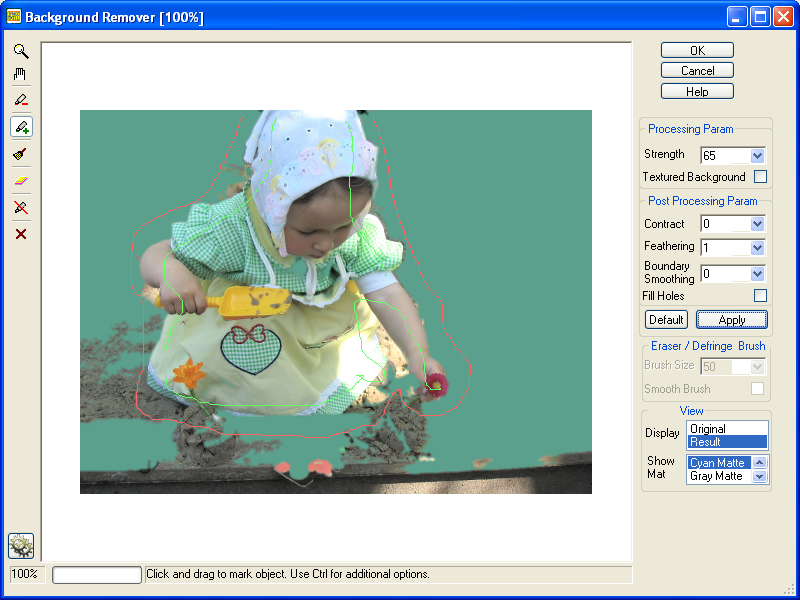
Fig.11. STRENGTH = 65, Textured background is "Off"
This option deals with the flag Textured Background as the next parameter. In the real life object of interest usually is located on some textured background – brick wall, parquet, wallpaper, flora, and so on. In such cases the part of an image to be deleted is
characterized with complexity of a color spatial distribution. This fact causes some troubles for the algorithm and complicates the choice of the appropriate value of the STRENGTH parameter. The flag Textured Background helps to avoid this problem. Comparing Fig.11 and Fig.12 one can see that the girl is kept more clearly in the latter case than in the former one. Note that the same value 65 of the STRENGTH parameter is used in both cases but the flag Textured Background is “Turn On” in the second one.
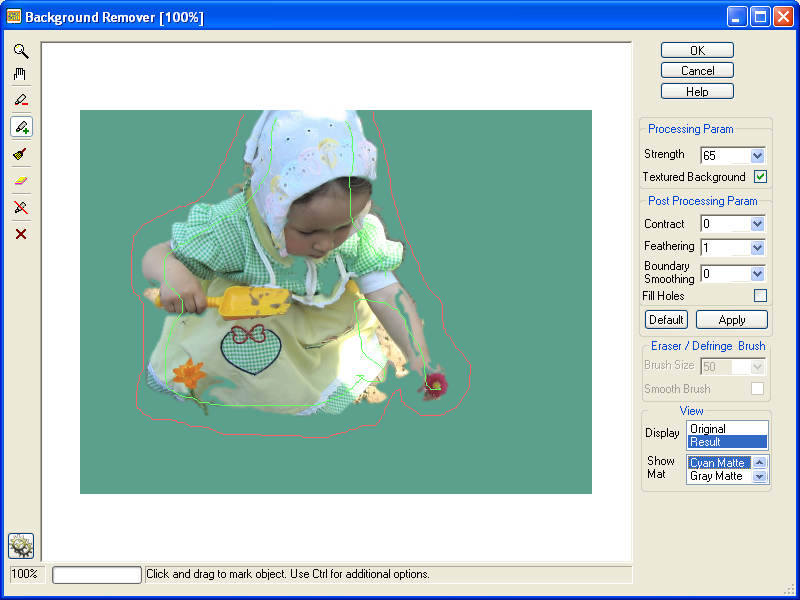
Fig.12. STRENGTH = 65, Textured background is "On"
So, just another advice to try to make your result better is to turn on the flag Textured Background, if an object of interest is placed on textured (complex) background.
The next option that may help you to correct the resulting image deals with filling of irrelevant holes appearing inside the object to be kept. Look at Fig.13 and see how annoying may be such holes after putting the object on uniform background. FILL HOLES option is very effective when you come across with such situation. All you need is to switch on the appropriate flag FILL HOLES and press APPLY button again. Be sure that you will never get any new holes inside the object.

Fig.13. Fill holes flag is "On"
The third way of the result enhancement is to adjust the CONTRACT parameter. Varying its value from 0 to 100 you can manage the strength of uniform object’s shrinking along the object’s perimeter. Note that 0 is the default value of CONTRACT parameter when no adjustment is done. The higher CONTRACT value is the stronger shrinking effect you get. This option makes sense when the boundary between the object to be kept and the background to be removed has rather high contrast parts. Look at fig.12 achieved under zero CONTRACT value. You can notice an annoying dark border over the girl's left hand. To avoid an unpleasant visibility of such parts on a resulting image you need to increase CONTRACT value. But please be careful and note that if you set it excessively high you can get an excessive background removing that is visually equivalent to an excessive object contraction. This fact is illustrated with Fig.14 (CONTRACT = 1) where the result is quite good enough and with Fig.15 (CONTRACT = 10) where the girl looks like nibbled.

Fig.14. Contract is 1. Good result.
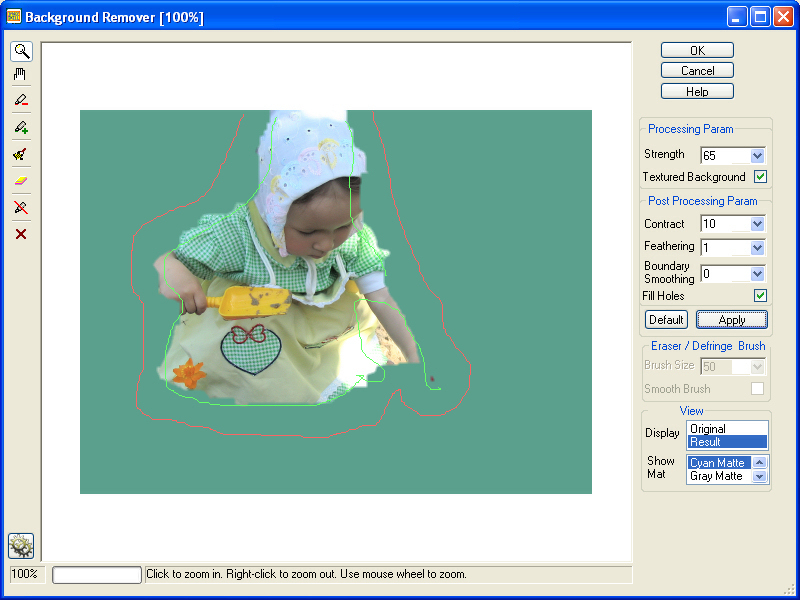
Fig.15. Contract is 10.
The forth way to enhance the visual perception of a result image is to soften the boundary between the object and the background. You know that excessive sharpness of this boundary becomes rather annoying especially when an object is located on an artificial background. This fact is illustrated with Fig.16 where the blue background is taken to make the unpleasant visual effect more impressive. The softening is done by adjustment of the FEATHERING parameter in the range from 0 to 50. Value 0 corresponds to the case with no softening adjustment. Default value is 1.

Fig.16. Using Feathering you can smooth color transition.
The fifth way to make your result visually better is to try a boundary smoothing option. It is done with the appropriate choice of BOUNDARY SMOOTHING parameter in the range from 0 to 9. After the background removing this option may help you to some extent to make geometrical irregularities of object’s boundary slightly visible and get the resulting image looking more natural. It is very important when you are going to put your selected object on uniform background. Looking at Fig.17 you can see how parameter BOUNDARY SMOOTHING does work. Its value was set to 9.
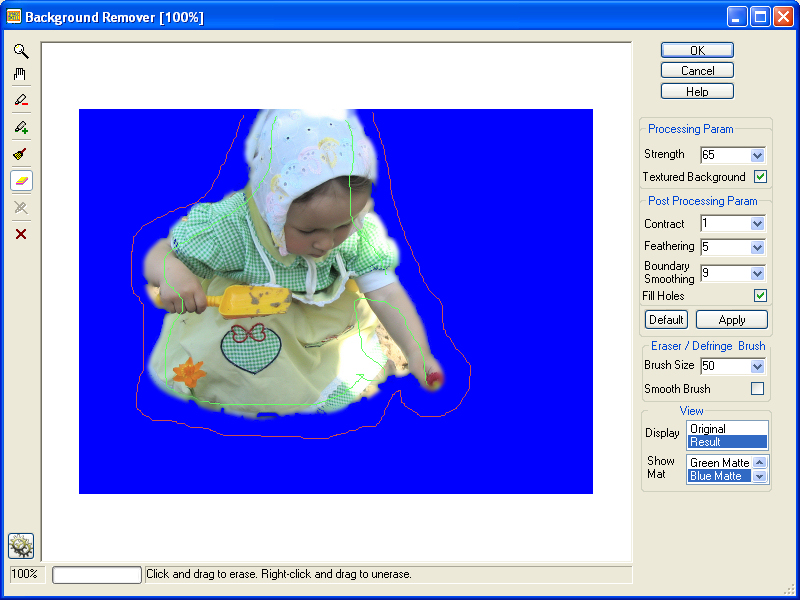
Fig.17. Using boundary smoothing option you can make edges more smooth.
If you need to make some correction in some part of an image only you may try two correcting brushes for that.
The first one is ERASER  brush. You can manage the correction of the resulting image with such brush in a very simple way. Pressing left mouse button you can erase something in an image while pressing the right mouse button you can restore something deleted before. It is convenient to use this brush when the automatic background removing was successful, but some parts of an image were not deleted, and these parts are not contiguous to the object to be kept. This brush is working by the same way as the similar tool in the most of graphic editors. The brush size and distribution of brush strength may be set with the parameters Brush size and Smooth brush
The second one is DEFRINGE BRUSH  . With this brush one can draw so called “transition zone” in an image where the
color correction should be performed. Why do you need such a correction? Let us look at this problem in some detail. Anyone can see that in the most real images there is some
color transition zone from an object to the surrounding background. In this zone a
color of each pixel is defined as some mixture of an object
color and a background color. A type of mixture and the
colors proportion in it depends on an object and background properties and properties of a system of image forming. After deleting background pixels you can get distorted
colors of transition zone pixels and this distortion is intensified when an object is placed on a new background. These distortions are especially noticeable when you deal with so called semi-transparent objects like strands of flying hair, a fog, a hairlines of fur and so on. As a result some unnatural, annoying
colors arise in the image. An example of such situation you can see in fig.
18-21. With the DEFRINGE brush being described here one can draw a transition zone in an image (Fig.20).
Color correction will be performed in the marked zone only. An example of the result of such correction one can see in Fig.21.
. With this brush one can draw so called “transition zone” in an image where the
color correction should be performed. Why do you need such a correction? Let us look at this problem in some detail. Anyone can see that in the most real images there is some
color transition zone from an object to the surrounding background. In this zone a
color of each pixel is defined as some mixture of an object
color and a background color. A type of mixture and the
colors proportion in it depends on an object and background properties and properties of a system of image forming. After deleting background pixels you can get distorted
colors of transition zone pixels and this distortion is intensified when an object is placed on a new background. These distortions are especially noticeable when you deal with so called semi-transparent objects like strands of flying hair, a fog, a hairlines of fur and so on. As a result some unnatural, annoying
colors arise in the image. An example of such situation you can see in fig.
18-21. With the DEFRINGE brush being described here one can draw a transition zone in an image (Fig.20).
Color correction will be performed in the marked zone only. An example of the result of such correction one can see in Fig.21.
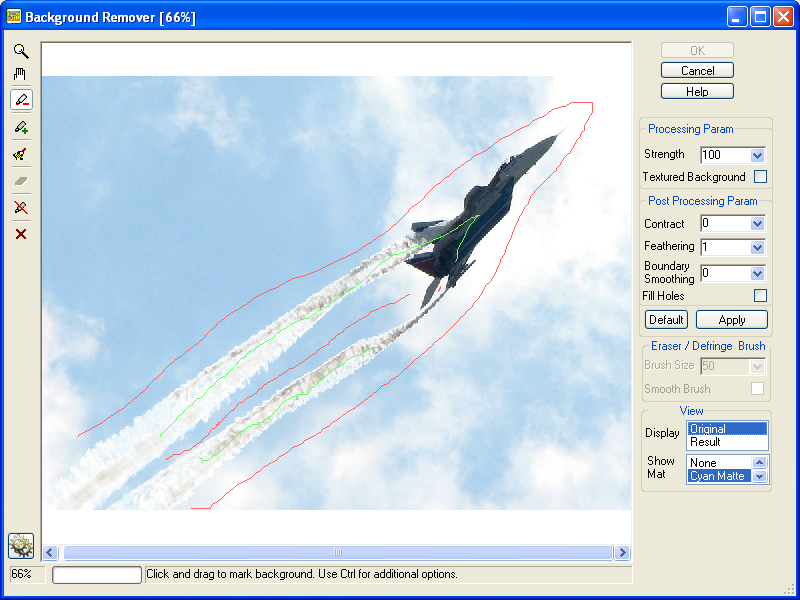
Fig.18. Source image with "Object" and "Background" marks.
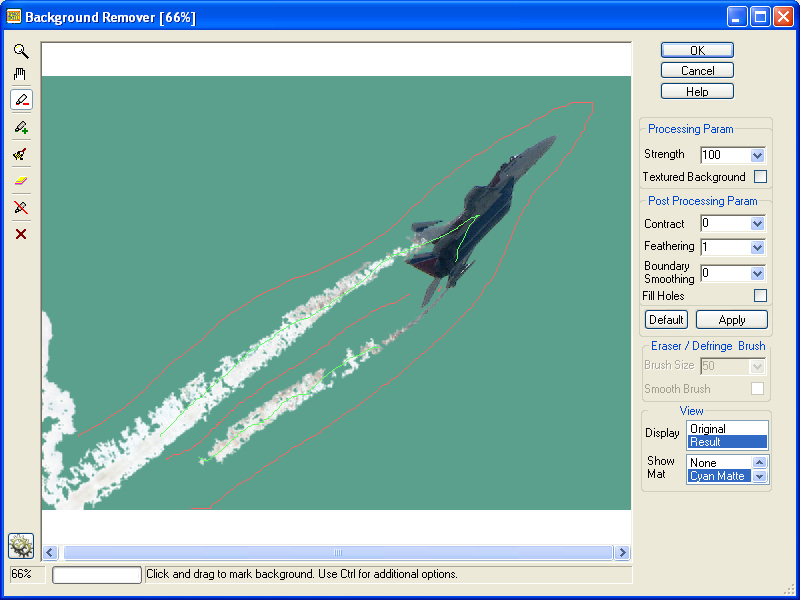
Fig.19. Result of extraction. Turbulent jet is not good
enough.
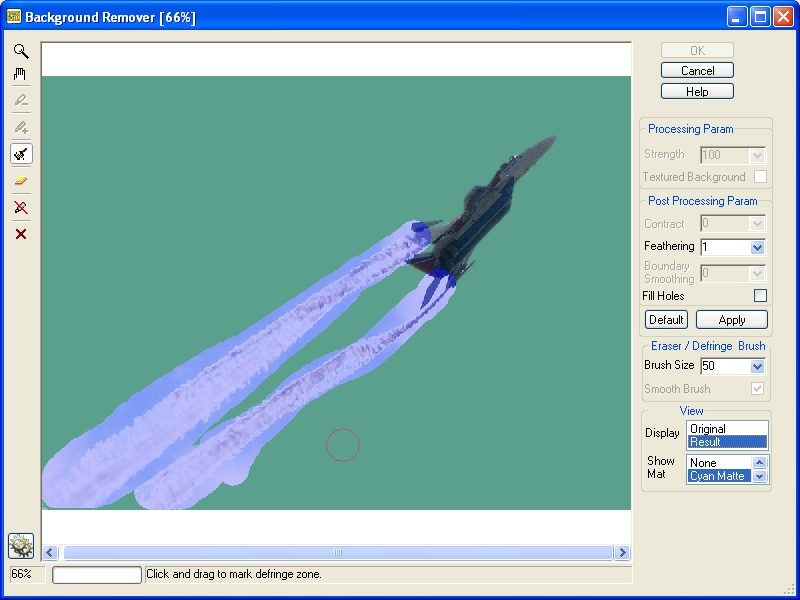
Fig.20. Mark area for color correction using DEFRINGE brush.
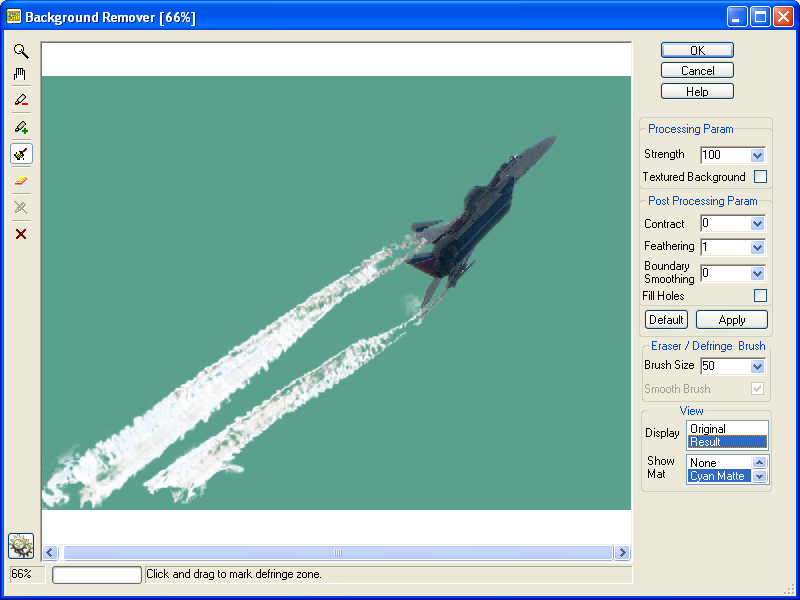
Fig.21. Result of color correction.
Remember that trying this brush you are free to set any its size you need with appropriate slider.
Additional options dealing with the result visualization you can find in the window View. They cannot help you to correct the resulting image but may be very useful for understanding where there is a problem.
The first such option gives you an opportunity of dynamic switching of viewing from Original image to Result one still staying in the Background Remover plug-in. It is done in the window Display picking on the image type you need to look at. This option can help you on the fly to catch any changes in the resulting image and choose an appropriate correcting procedure.
The second such option allows you to pick on a color of a mat on which the selected object is temporary placed. It is done with the drop-list in the window SHOW MAT. Default mat is set to be a chessboard. The "Object" placed on the uniformly painted mat makes easier the visual estimation how this object will be looked like in future composition on various backgrounds. Note, that this placement is only temporary one. After exit the Background Remover the main graphic editor places the result on chessboard again. The problem of image composition is not touched here.
Some notes as conclusion
Some questions may arise especially for a beginner in image processing: “Why do we see some holes in the result image? Why do we not see real background or overlapped object?”
An answer is: “The things that were under deleted substance reflected no light when an image was formed, so they were not registered on a film or photo sensor. So there are no signs of those substances in the image.”
“Why does somebody need an image with holes?”
The answer is: “Such an image is only a half-finished product for subsequent composition of the new image.”
For example, one can obtain image shown in Fig.22, using our Background Remover and subsequent composition starting from the image shown in Fig.17.
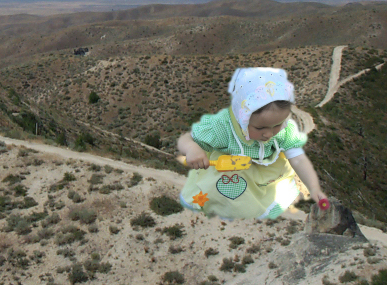
Fig.22. Collage.
We would like to note, that possibilities and extra means, described here do not make the process of work with the Background Remover too complex, and after minimal mastering allow to obtain expecting result of an object selecting with minimal efforts and with a natural way.
Good luck!