Translucator |
|
Translucator is a Photoshop-compatible plug-in for Windows designed by
ImageSkill Software that can work with Adobe Photoshop, Adobe Photoshop Elements, Corel (Jasc) Paint Shop Pro, Microsoft Digital Image Suite etc.
Translucator extracts translucent objects (like glass, smoke, fog, fur etc.) from photo in a few mouse
clicks with a perfect result. The Translucator unmixs object's and background's colors in processed areas, so you can then place result on other background properly. The cutting objects may be used for collage, scrap-book and greeting card creation.
|
|
|
|
This help contains the following sections:
|
Recent changes
|
|
|
|
Install and uninstall procedures
|
|
|
Run setup file. Installer try to find suitable graphic hosts. Choose one of them from the list. If you want to install
plug-in in other folder, select item "Other path" and set path. In this case you must set "Plug-ins path" of your graphic host
to setup folder.
In order to uninstall plug-in run uninstall.exe or use
Add and Remove Programs item in the Control Panel.
|
Tool, Sliders and Buttons Descriptions
|
|
|
 Zoom tool Zoom tool
|
Use this tool for zooming. Click to zoom in. Right-click to zoom out.
|
 Pan tool Pan tool
|
Click and drag to pan images larger than the windows.
|
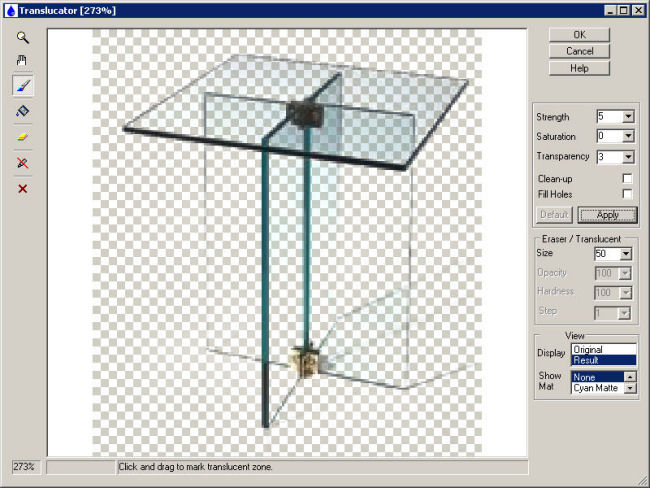
 Mark translucent zone brush Mark translucent zone brush
|
Click and drag to mark translucent areas. Marked areas are marked semi-transparent blue color. After applying, some opacity will be assigned.
Unmarked area will be transparent.
|
 Flood Fill translucent area tool
|
Click to fill translucent area.
|
 Delete all marks tool Delete all marks tool
|
Drop all marks.
|
 Manual Erase/Recover tool Manual Erase/Recover tool
|
Using this tool for manual erasing/restoring undesirable areas. You can set brush size and softness.
|
 Reset Reset
|
Revert all operations to original image.
|
Strength
|
Use this slider to increase/decrease strength of background erasing.
|
Saturation
|
Use this slider to increase/decrease saturation of selected object.
|
Transparency
|
Use this slider to increase/decrease
transparency of selected object.
|
Fill Holes
|
Check this flag if you want to fill holes within received mask.
|
Clean-Up
|
Check this flag if you want to remove debris within received mask.
|
Brush Size
|
Determines size of the brush in pixels.
|
Opacity
|
Determines brush opacity.
|
Hardness
|
Determines brush hardness.
|
Step
|
Determines brush step.
|
Display
|
Use Display menu options to switch between previews of the original and extracted images.
|
Show Mat
|
Use Show Mat menu options to preview the extracted object against a colored matte background. To display a transparent background, choose None.
|
|
Using Translucator
|
|
|
This plug-in works under RGB layer with 8 or 16 bits/channel only. If your image has no layer you must create one at first.
- Open an image in your graphic editor.
- Create a layer (if your image is not layer yet). (For example, in the Adobe Photoshop use "Layer->New->Layer from Background..." menu item).
- Run the Translucator plug-in. (For example, in the Adobe Photoshop use "Filter->Image Skill->Translucator" menu item).
- Using Mark translucent zone brush and (or) Flood fill translucent zone tool mark translucent area that you want to delete.
- Press Apply button in order to extract selected objects.
- If you result of extraction is unsatisfactory, adjust the Strength control or (and) Opacity control, then press Apply again.
- If need, delete all marks using Delete all marks tool
and repeat steps 4-6 in order to achieve desirable result. If you can not do it, use Manual Erase/Recover tool.
- If need check the Fill Holes and (or) Clean-up flags for hole filling and debris removing, then press Apply.
- Press OK button and return to host.
|
Tutorial
|
|
Use this tutorial to learn how to extract the translucent
object ("Guinness glass") from the image.

- Our image is a background and we must create layer. For example: in the Adobe Photoshop "Layer->New->Layer from Background".
- Run Translucator plug-in: "Filter->Image Skill->Translucator ".
- Select Mark Translucent zone brush and mark object (semi-transparent blue).
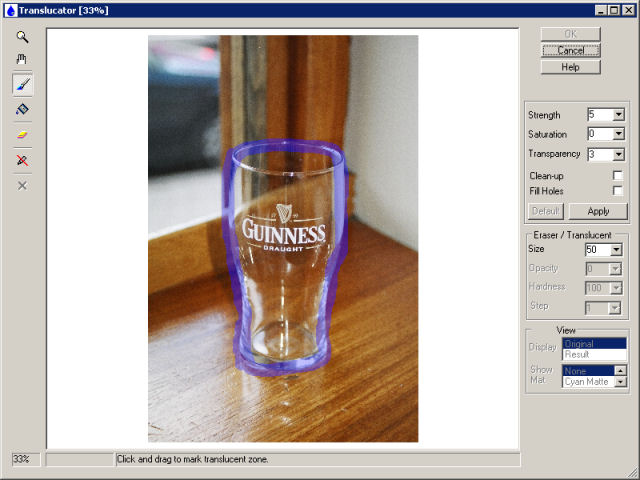
You do not need outline object accuratelly. Translucent zone can include part of background.
- Select Flood fill tool and fill translucent area.
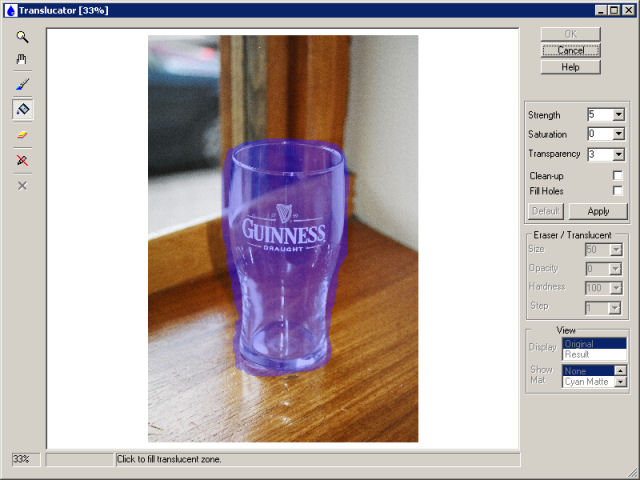
- Press Apply.
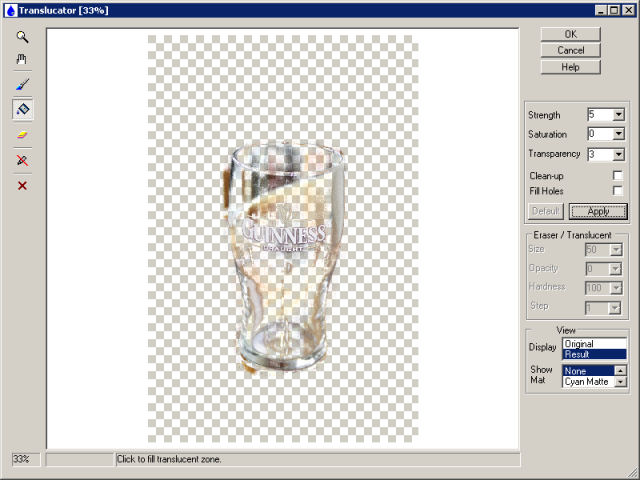
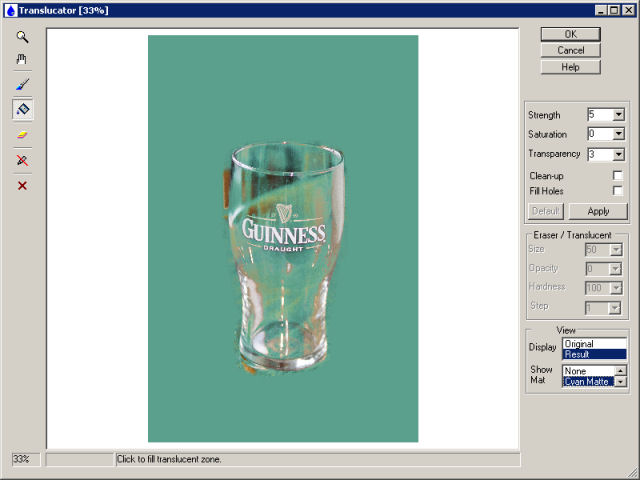
You can see that result is needed for tuning.
- Set background color to Cyan by setting Show Mat parameter to "Cyan Matte".
- Increase Strength parameter to 10 in order to increase degree of erasing.
- Check Clean Up flag in order to avoid debris.
- Press Apply.
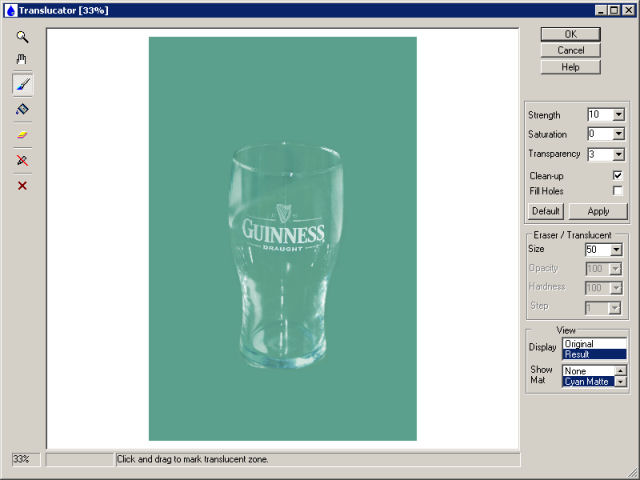
This is a final result of extraction.
- Press Ok and pass result image to host program.
|
FAQ and Troubleshooting
|
|
I can not run Translucator or Translucator is grey out in graphic host’s effect menu.
Graphic hosts disable the plug-in if the current image is not suitable for use with Translucator. Image must be in RGB format with 8 or 16 bit/channel and must have a layer (i.e. image must have 4 channels: R, G, B, and Alpha). If image has CMYK, LAB, Grayscale or something other format, you have to convert it to RGB. If image has no layer you have to create it at first.
Why my marked zone disappears?
All marks are removed when you select “Manual Erasing” tool . Use this tool at final stage of extraction.
What does happen if my image already has transparent area?
When you process image with transparent areas, the final transparency in such points will not less than source transparency. I.e. plug-in does not increase alpha value in transparent areas.
How does plug-in process selection?
The Translucator affects to selected area only. The unselected area is still unchanged. The unselected area is shown a red semi-transparent color in main plug-in window. Plug-in deals with the bounding box selection.
What to do when object too much is erased
Try to decrease “Strength” parameter and press “Apply” button again. Check flag “Fill Holes” in order to fill small holes into extracted object.
What to do when background not enough is erased
Try to increase “Strength” parameter and press “Apply” button again. Uncheck flag “Clean Up” in order to remove debris within received mask. Try to correct marks of translucent zone.
Translucator unmixs object’s and background’s colors for calculation alpha value in each point. When you mark translucent zones, do not afraid of mark background. It is better than unmark translucent object
|
Quick Buy
|
|
|
You can order full version of this plug-in now ($29.95). Just now, we upgrade our products for registered customer free of charge.
Order this product via


|